With COVID-19 home confinement, braiding may just be your new go-to trick to keep root regrowth hidden and long bangs and haircuts under control. Braiding has become one of the most popular hair trends in recent years, and it's no wonder as there are definitely some braids popping up on social media that will make you want to better your braiding skills right away.
Why are braids so desirable? It is because they can be worn for almost every occasion, so now is your time to practice this method for when confinement is finished. You can have braids when you go for casual dinners, dressed up events or even workouts. When you let out your braid, you are left with a whole new hairstyle for a couple of days. In this week's journal, we are sharing with you 4 Step-By-Step Braid Tutorials And Hair Tips For Braids. Take a peek at some of these styles and see if you are inspired to try any of them at home! We have made a selection of looks for beginners and for those that are already very savvy with hair.

In this article, we will feature:
- French Braid
- Rope Braid
- Fishtail Braid
- Pipe Braid
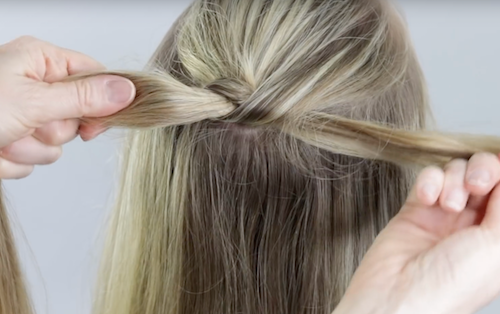
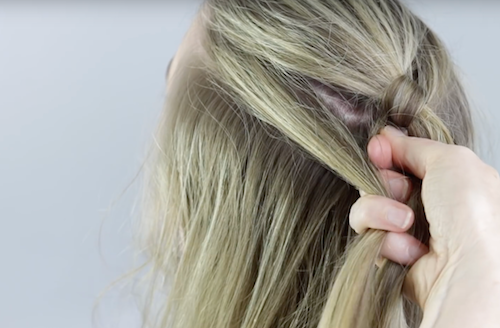
The French Braid
By now, many of you are already familiar with how to do a 3 strand braid. Then the next step from a 3 strand braid is a French braid. The French Braid basically follows the same method as the 3 strand braid with a couple more steps. Let's take a deeper look into how to create a French Braid.
- Step 1: To begin, be sure you are prepping your hair with a product to control your hair while you are braiding. Our Iles Formula Finishing Serum works very well for prepping hair for braids as it keeps the hair controlled while braiding as well as eliminates flyaways.
- Step 2: After Applying the product Brush the hair thoroughly.
- Step 3: Take a triangular section at the top front of your hairline, and split it into 3 sections.
- Step 4: Next, cross the left strand over the middle following a traditional 3 strand braid technique. Then the right strand over the middle.
- Step 5: Follow this step 2 times. Once you have completed two rounds, pick up a small section of hair from the left and feed it into the left strand before crossing it over the middle. Repeat this step on the right side and then the left, and so on. Continue until you have braided all of the hair to the ends.
- Step 6: If you prefer, add a hair accessory like the one in the image below created by Adir Abergel and Lelet NY.

Photo: Adir X Lelet

Photo via Pinterest

Photo via Pinterest
The Rope Braid
The Rope Braid has quickly become a very popular braid, mostly because it is not too hard to create once you get the hang of it, but it looks very intricate. Let's take a peek at the steps for achieving the Rope Braid.
- Step 1: Begin by brushing out your hair very well, this braid will not work if you have too many tangles. After you have brushed it out well, you can again add our Iles Formula Finishing Serum to control the hair while braiding.
- Step 2: Brush your hair into a ponytail and secure with an elastic. The ponytail can be located high on the head, or low whichever you prefer.
- Step 3: Separate the ponytail into two strands.
- Step 4: Twist both strands of the ponytail to the right, and then cross the right strand over the left and under, returning it back to the right.
- Step 5: Continue the process until you reach the ends.
- Step 6: Secure the ends with an elastic.

The Fish Tail Braid
Everyone loves a fishtail braid and it's no surprise because it looks very difficult to do, but with some practice, it is actually quite easy to create. After you prep your hair like the above braids by brushing and using a product to control the hair, you can then follow the steps below for a Fish Tail braid that will leave you feeling like your heading off to Coachella.
- Step 1: A fishtail braid can be worn so many ways. It can be worn in a higher ponytail and sleek or low and lived-in looking. Decide which variation of the braid you want to wear and then secure it with a ponytail.
- Step 2: Split the ponytail in two.
- Step 3: Grab a small section of hair from the outside of the left strand and feed it over the top into the middle and then add it to the right strand.
- Step 4: Repeat on the right side and continue from side to side until you have created a braid all the way to the ends.
- Step 5: If you are choosing to wear the sleek variation of the braid then you are finished. If you want a more live in look, then you will slightly pull at the outside of the braid to loosen it some. Once you have pulled apart the sides, you can take a soft brush and brush upward on the braid to create some loose bits like demonstrated below.

Photo by: Mark Leibowitz for Tory Burch
The Pipe Braid
The Pipe Braid has been around for a while but is one of the newest braiding trends that we are seeing on the runway and in tutorials on Instagram. Nicci Welsh celebrity hair and makeup artist was the inventor of this beautiful braid. It's a very chic way to change up traditional braiding for a hairstyle you can't resist. The Pipe Braid can be a bit more technical, so it may take some practice before mastering. The hair is always one of the most important steps when braiding so be sure to prep the hair as noted above for a clean-finished result.
- Step 1: Apply Iles Formula Finishing Serum throughout the hair to obtain control over fly-aways. To begin braiding your hair, brush the hair smoothly and away from the face. In the front and top centre, take a rectangular section that aligns with the inside of the eyebrows and rounds at the back high point(can't understand this) of the head. This will become section 1.
- Step 2: This braid is created using 4 knots, and once the 4 knots are created you repeat the process over and over again. Take a second section on the right side like you are creating a French braid.
- Step 3: The hand position is very important for beginning the knot. Section one is held between your left pointer and ring finger. Section two, make a "u" with your right thumb and pointer finger and slide it under section two while holding the ends of section two with your left thumb and pointer finger. See the image below for reference from HAU2 tutorial on YouTube.

Photo: Nicci Welsh HAU2 YouTube
- Step 4: Have the right thumb and index finger ready to pinch, and direct the ends in the left fingers under section one and then twist your hands to feed it over section 1. Then grab the ends with the right thumb and index finger, this will create a knot. See below for reference.

Photos: Nicci Welsh for HAU2 on YouTube
Photos: Nicci Welsh for HAU2 on YouTube
- Step 5: Pull the knot tight to make sure it sits high, and then feed the right section over to the left and pull tight again, this will ensure the knot is extra tight. When you tighten, pull the hair up towards the top of the head.

Photos: Nicci Welsh for HAU2 on YouTube
- Step 6: Repeat the same process on the left side reversing the hand position. To help you while creating section two on the left side, allow the left strand of hair to rest in the fingers as demonstrated below.

Photos: Nicci Welsh for HAU2 on YouTube
- Step 7: After closing the fingers to hold that section, your left hand will become free to feed in another section on the left side. Use the pinky to scoop up a section and feed it into your fingers, just like you do when French braiding. Keep it separate from the other section you are holding out of the way in your fingers.
- Step 8: Keeping that new section secured in your ring finger, take the other section on the left side and have your client hold it to keep it out of the way.

Photos: Nicci Welsh for HAU2 on YouTube
- Step 9: Repeat the same technique but reverse the finger positioning for the left side.

Photos: Nicci Welsh for HAU2 on YouTube
- Step 10: That makes the first two knots, for the second two knots, you hold the section on the right side with a clip, and then grab the left section that is in the clip. For these next two knots, you will not be adding in any hair, but following the same steps on each side twice.

Photos: Nicci Welsh for HAU2 on YouTube
- Step 11: Finally you will repeat the entire 4 knots exactly as previous 4 and continue to repeat over and over until you have reached the nape area and secure with an elastic. To see the original video for this technique, you can view it HERE. See the image below for a reference for how the finished product will look.

Hair by @nicciwelsh on instagram
Now that you have 4 new braid techniques to try, we can't wait to see what you create with them. Keep in mind a braid can really be as simple or as detailed as you want it to be. Adding accessories to a braid is a great way to change it up from day to night as well, so don't be afraid to have some fun.
One final note, but definitely the most important as we mentioned is the treatments and products for braids. When it comes to braiding, it's all about prepping the braid with Finishing Serum and upon releasing your braid, simply add a smear of our Curl Revive to prevent the humidity from destroying the form, and it will also settle down frizzies for a perfect undone braided style every time.
Trust when we say, even with home confinement, having your hair looking and feeling good is a big part of your well being. Think nurture first, hair can certainly be healed with the correct high performant products.

 Curl Revive - Click the above picture for more details
0 comments